Mountain of Material with No Width to the hardband
Irregular edges, excessive spatter, and voids
Puddle volume is too great, Weld metal spills & creates a void
Irregular band, puddle appears to be rugged and possible spatter
Uneven or wavy edges of the band
Poor bead tie-in leading to a crack
Concave Bead
Excessive spadder - Wavy rough bead
Excessive spadder - Wavy rough bead
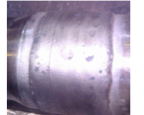
Low Band Height
Low Hardband Height
Common Defect Causes
Chuck rotation too fast
Amps are too low
wire speed is too low
How To Fix
Adjust rotation speed to slower rate
Increase amps
Increase wire speed
**good starting point formula for chuck speed: OD (outer diameter of pipe being hardbanded in inches) x 3.14 x 7 = seconds per revolution. Start with this and make adjustments as needed
Band is humped on one side
Hardband Humped on One Side
Common Defect Causes
Amps are too high
Wire speed is too high
or Rotation is too slow
How To Fix
Decrease wire speed or amps until hump disappears or
Increase rotation speed to match wire speed and amps, make sure no voids appear
**Rotation speed isn’t fast enough for the amount of material being deposited
Exaggerated Humping of the band
Exaggerated Hump on Hardband
Common Defect Causes
Torch angle is too high
Torch offset is wrong
How To Fix
Adjust torch angle from 10° to 18° (15° is usually fine)
Set torch offset between 1" and 3/4"
**Take time to set up your torch settings before you start welding. The angle and offset could have changed after the unit was moved or someone else could have adjusted them between uses.
Thick un-even and inconsisten bead profile
Thick Un-Even and Inconsistent Hardband Profile
Common Defect Causes
Torch angle is set wrong
Wire feeder rolls may be worn
Wire tension may be too high
How To Fix
Check wire feeder rolls and change is necessary
Check wire tension
Check to make sure pipe is making a good ground with the chuck
**Check wire after it exits the wire feeder, it shouldn’t be heavily marked. The wire tension should be just enough to manually pull the wire thru the spool with about 5 lbs of pulling force.
**For the pipe to make a good ground with the chuck, make sure the pipe is clean where the chuck clamps to it
Excessive spadder, voids, and harsh arc
Excessive Spatter, Voids, Harsh Arc
Common Defect Causes
Wrong shielding gas being used
No shielding gas being used (tank is empty or valve is off)
How To Fix
Use shielding gas that hardband wire calls for
Make sure the correct CFM is set for torch
**Before starting the weld use the “Purge” button to make sure gas is present and to dial in your CFM’s. 35 – 45 CFM is typically a good setting for most torches, but this may need to be more if the environment is windy
Excessive oscillation marks & cold laps on band edges
Excessive Oscillation Marks
Common Defect Causes
Oscillatiion rate is too high
How To Fix
Reduce oscillation rate to provide a more even rate of weld material deposit
Check for cold lapping where puddle overlapped. If not properly tied in band may need to be removed
**Oscillation rate should be between 65 – 80 OPM. Take time to Dial in hardband machine before welding starts.
Heavy oscillation marks
Heavy Oscillation Marks
Common Defect Causes
Oscillation is too slow. Wire speed and voltage may also need adjustment.
How To Fix
Adjust the oscillation to a higher rate until oscillation marks become smooth. Adjust for slower wire speed and voltage.
**Oscillation rate should be between 65 – 80 OPM. Take time to Dial in hardband machine before welding starts.
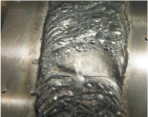
Mound of material and no width to the band
Mountain of Material with No Width to the hardband
Common Defect Causes
Oscillation was not turned on when the welding started.
How To Fix
Grind Flush
Make certain that oscillator is on then re-apply hardband
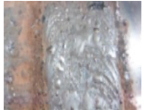
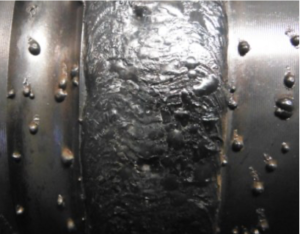
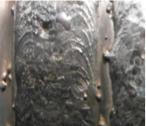
Irregular edges, excessive spatter, and voids
Irregular edges, excessive spatter, and voids
Common Defect Causes
Loss of gas cover due to windy conditions. Wavy band edges can also be attributed to “Arc Blow”, which occurs when the pipe has been exposed to a magnetic field and has some residual magnetism. The magnetism disrupts the arc and causes irregular edges.
How To Fix
Eliminate the windy condition on the tool joint. Turn off any fans blowing directly onto the tool joint. Check closely to determine if any porosity has occurred by lightly grinding the surface to reveal the defect. Repair if necessary.
If “Arc Blow” is the problem, the pipe should be demagnetized if possible, by a competent source. Some magnetism can be reduced by wrapping AC welding cables around the tool joint, and decreasing the voltage slowly.
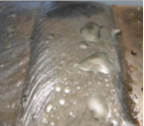
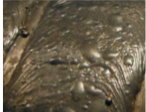
Puddle volume is too great, Weld metal spills & creates a void
Puddle volume is too great, Weld metal spills & creates a void
Common Defect Causes
Offset is set to ZERO. This should be set from 3/4” to 1”
Offset is set to too much, beyond 1”
How To Fix
Adjust to the appropriate offset. Deposit may require grinding to acceptable OD. Re-application may be required in areas that are too low and out of spec.
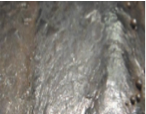
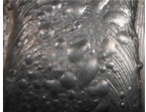
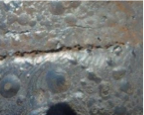
Irregular band, puddle appears to be rugged and possible spatter
Irregular band, puddle appears to be rugged and possible spatter
Common Defect Causes
Shielding gas is too High, 74 CFH. Bands appear very much like excessive wind or loss of gas cover. Excessive gas flow causes turbulence on the surface of the puddle and causes irregular freezing and rugged looking bands.
How To Fix
Reduce the gas flow to the correct settings. Repair any defects that might have developed. It is rare when this type of defect causes the removal of the band completely.
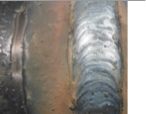
Uneven or wavy edges of the band
Uneven or wavy edges of the band
Common Defect Causes
Wavy deposits usually results from a long electrical stick-out of the wire. Shortening the stick-out will tighten up the arc and create straighter deposits or bands.
Wire may be bent caused by heavy pressure on “wire straighteners”. If this is the case, decrease the straightener tension until the wire is no longer bent.
Check all electrical connections.
How To Fix
While this defect is objectionable it is usually not cause for rejection. Check to note any porosity associated with the wavy deposit. If clear of any porosity, adjust the torch height from 3/4” to 1-1/8” as outlined in the Manual.
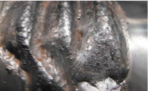
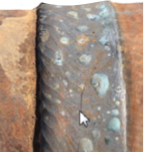
Poor bead tie-in leading to a crack
Poor bead tie-in leading to a crack
Common Defect Causes
The crack is due to a contaminated previous hardband. There was insufficient removal of the previous hardband which led to a contaminated final hardband deposit. This was accompanied by poor bead Tie-In, which also led to a crack.
How To Fix
Complete removal of the final hardband in addition to a complete removal of the previous hardband is in order. It may be necessary to remove as much as 5/32” (4.0mm) below the surface of the tool joint O.D.
Build up with a mild steel wire and finish with Duraband® NC or Tuffband® NC as the final hardband.
Concave Bead
Concave Bead
Common Defect Causes
Concave shaped weld beads can result from “High Voltage” or “Low Oscillation Speed”. Voltage can be thought of as a pressure that is exerted on the molten puddle. When this pressure becomes excessive, the puddle flattens out or becomes concave during the freezing process. Some have attributed this defect to the high voltage and excess fluidity of the puddle. Oscillation creates an excessive amount of weld metal at the extreme ends of the oscillation track because the weld head has to come to a stop and reverse direction, causing a pile up of weld metal during the freezing process.
How To Fix
Examine the concave bead for any cracks. If no cracks, grind the concave bead flat to avoid any cracking in the field.
Lower the voltage to the range specified in the Manual.
Speed up the oscillation speed to eliminate the concave bead.
Increase amps or wire speed. Increase torch angle.
Excessive spadder - Wavy rough bead
Excessive spadder - Wavy rough bead
Common Defect Causes
A condition known as “ARC BLOW” produces this type of defect. It occurs usually because of residual magnetism left in the pipe from inspection techniques. The magnetism can be reduced or eliminated from the hardbanding area by wrapping an AC cable around the tool joint and slowly reduce the voltage. Most often, a reputable vendor can apply the required techniques. This may be costly, but the alternative unacceptable weld bead will be far more expensive
How To Fix
If most of the hardbanding has suffered from “ARC BLOW”, it is recommended that complete hardbanding removal be conducted. If the condition is caught in time and only one or two beads are affected, then the removal of the affected beads requires removal flush to the surface of the O.D. Apply Tuffband® NC or Duraband® NC over the flush remainder.